Activity Due: Due Date #3
Both activities for this week will be due at this same time. Get started ASAP.
Instructions
- Open TextWrangler and a new blank document
- Copy and paste the below HTML code into this document
- Save this document as process.html (in your practice folder)
- Open another blank document in TextWrangler
- Copy and paste the CSS code below into this blank document
- Save it as “beestyle.css” (Save this also inside the practice folder)
- Reopen the process.html page and use the link tag to connect this document with the beestyles.css (See page 235)
- Save this document again
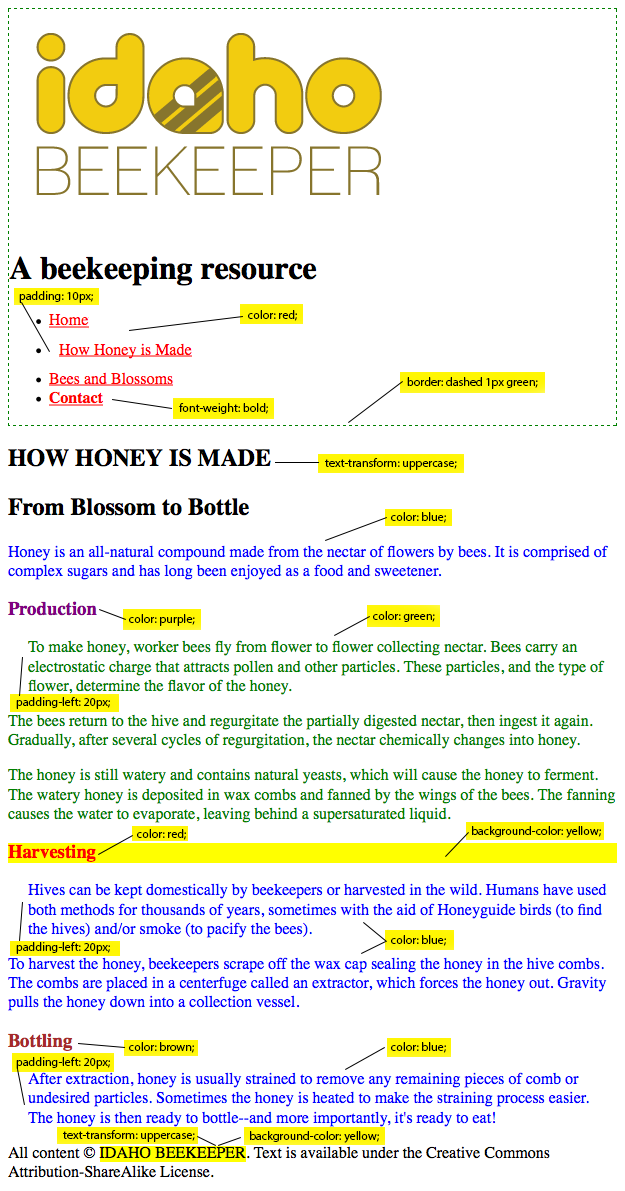
- View the Week 4 Day 1 Screenshot on this page. Use this screenshot to guide you through styling the process.html page (Right click and select “view image” to see a larger version of the screenshot).
- Use the prescribed selector methods outlined in the notes of the CSS on this page. For instance if the comment says “ID selectors (Matches by id attribute),” then you will want to use an ID to select/style the correct element of the page.
NOTICE: I have provided you with incomplete HTML/CSS. You will need to place some ids/classes into the HTML, and you will need to fill in the blank selector, declaration, property, value, or a mix of these to complete the CSS. Use the selectors outlined in the CSS comments!
- Validate your HTML document (http://validator.w3.org/)
- Validate your CSS document (http://jigsaw.w3.org/css-validator/)
- Upload these new and updated files to your practice folder on your website (yourWebsiteName.com/practice)
HTML to Copy
<!DOCTYPE html>

<html>

<head>

    <title>Idaho Beekeeper | How Honey is Made</title>

    <meta charset="utf-8" />

</head>

<body>

    <header>

        <img src="images/logo.png" alt="Idaho Beekeeper Logo" />

        <h1>A beekeeping resource</h1>

        <nav>

            <ul>

                <li><a href="index.html">Home</a>
                </li>

                <li><a href="process.html">How Honey is Made</a>
                </li>

                <li><a href="types.html">Bees and Blossoms</a>
                </li>

                <li><a href="contact.html">Contact</a>
                </li>

            </ul>

        </nav>

    </header>

    <main>

        <article>

            <h1>How Honey is Made</h1>

            <h2>From Blossom to Bottle</h2>

            <p>Honey is an all-natural compound made from the nectar of flowers by bees. It is comprised of complex sugars and has long been enjoyed as a food and sweetener.</p>

            <section>

                <h1>Production</h1>

                <p>To make honey, worker bees fly from flower to flower collecting nectar. Bees carry an electrostatic charge that attracts pollen and other particles. These particles, and the type of flower, determine the flavor of the honey.</p>

                <p>The bees return to the hive and regurgitate the partially digested nectar, then ingest it again. Gradually, after several cycles of regurgitation, the nectar chemically changes into honey.</p>

                <p>The honey is still watery and contains natural yeasts, which will cause the honey to ferment. The watery honey is deposited in wax combs and fanned by the wings of the bees. The fanning causes the water to evaporate, leaving behind a supersaturated liquid.</p>

            </section>

            <section>

                <h1>Harvesting</h1>

                <p>Hives can be kept domestically by beekeepers or harvested in the wild. Humans have used both methods for thousands of years, sometimes with the aid of Honeyguide birds (to find the hives) and/or smoke (to pacify the bees).</p>

                <p>To harvest the honey, beekeepers scrape off the wax cap sealing the honey in the hive combs. The combs are placed in a centerfuge called an extractor, which forces the honey out. Gravity pulls the honey down into a collection vessel.</p>

            </section>

            <section>

                <h1>Bottling</h1>

                <p>After extraction, honey is usually strained to remove any remaining pieces of comb or undesired particles. Sometimes the honey is heated to make the straining process easier. The honey is then ready to bottle--and more importantly, it's ready to eat! </p>

            </section>

        </article>

    </main>

    <footer>All content © <span>Idaho Beekeeper</span>. Text is available under the Creative Commons Attribution-ShareAlike License. </footer>

</body>

</html>
CSS to Copy
/*READ THESE NOTES!*/

/*This document is filled with instructions/help in the form of comments*/

/*This is how you write a CSS comment*/

/*It is suggested that you work through this assignment by following the comments/prompts in this CSS file from top to bottom*/


/*You will use Class selectors on the following two rules*/


	/*Take a look at the declaration (property: value;) of the following rule. Find the two elements in the screenshot that are both syled with a yellow background. Notice that the screenshot provides you with the declaration (property: value;) that should be used in this CSS document. You will need to insert the class name showme into the appropriate opening tags in the HTML file (see page 184 for more information about class attributes)*/

	.showme{

		background-color: yellow;

	}

	/*NOTICE that this rule should be a class, but it is missing the class name. You will need to choose a name, make it something descriptive, for this class selector. You will also need to insert this class into the HTML*/

	.{

		text-transform: uppercase;

	}


/*The following three rules should use ID selectors*/


	/*You will need to give these ID selectors names, and place the ids into the correct places in the HTML. Use the screenshot to determine what tag these IDs need to be placed on (see page 183 for more information about ID attributes). */

	#{

		color: purple;

	}

	/*This will change the Harvesting text color*/

	#{

		color: red;

	}

	#{

		color: brown;

	}


/*The following two rules should use Type Selectors. Type selectors are just the keywords used in the HTML tags. For instance a paragraph tag looks like this <p>, and the correlating CSS Type Selector would just be p (see page 238 for more information about Type Selectors)*/


	/*You will need to insert the correct type selector for the next two rules*/

	{
		border: dashed 1px green;

	}

	/*By default this will change your document to have all the paragraphs to be blue. A rule further down this page will change the color of the Production paragraph text to be green. Don't be confused when your document doesn't match the screenshot exactly just yet.*/

	{

		color: blue;

	}


/*The following two rules should use a mix of selectors (ex: #someid p - which would grab all paragraphs inside the element with the id of someid). This will require you to understand how to read the selectors. Reference the "How to Read CSS Selectors" page in the Week 4 Day 1 iLearn folder. Another good reference would be page 238 of the book, which will describe the different types of selectors.*/


	/*You will need to insert a class named "bolded" into the HTML. */

	li .bolded{

		font-weight: bold;

	}

	/*You will need to insert an id into the HTML named "production-section" This has been named to describe the element it should be placed on. */

	#production-section p{

		color: green;

	}


/*The following three rules should use more advanced selectors. The exact selector type is outlined below.*/


	/*Use a Child selector for the following (see page 238 for more information about Child Selectors). This rule will change the links text color.*/

	{

		color: red;

	}

	/*Use an Adjacent sibling selector for the following. The adjacent sibling selector matches an element that is the next sibling of another.*/

	{

		padding-left: 20px;

	}

	/*nth-child (This is not in your reading, but Google how it works. */

		li:nth-child(4){

		padding: 10px;

	}
Recent Comments